Meteor Photography
Perseid Meteor Shower 2021. 20 stacked sky shots. Sigma 14mm f/1.8. Meteors caught on each frame and placed back into shot at correct positions.
Introduction
In this guide you will learn how I approach shooting and editing images of meteors and meteor showers.
Seeing is Believing
Our eyes can interpret only 0.0035% of the electromagnetic spectrum. This phrase was never meant to apply to the night sky. We don’t see half of what is lurking up there in our beautiful cosmos, however we can begin the see a glimpse if we try to adapt our eyes for the night. In this game, it is best to leave misconceptions about our own eyes being truth-seers at the door and open our minds to what could be out there, and what is out there.
Dark Adaption
It takes the average human eyes about 45 minutes to become dark adapted, however studies show that improvements in night vision can occur for up to two hours! We don’t see much at all at first when looking up at the night sky unless it is extremely strong. However, our eyes are capable of seeing fainter meteors if we allow them time to adapt to the darkness. The purkinje effect describes the situation in human vision: as light levels decrease, the perception of warm colour drops, especially the red end of the spectrum. It is very important to observe the night sky with dark adapted eyes for this reason. To properly have our eyes adjusted for light levels this low, one must observe for at least 30 minutes and avoid all forms of artificial light during that time. This is a much longer time than most people give it. If you allow your eyes the proper length of time to adapt to the darkness, you are much more likely to see meteors.
When to Photograph Meteors
Technically speaking, meteors can occur at any time during the year. Most are the size of a grain of sand; traveling at vast speeds, they light up the sky for a brief period as they enter Earth’s atmosphere. In order to capture a meteor in this way is difficult and more random of course, so it is best to focus our attention to the major meteor showers peaks that occur every year, please note that you can still capture meteors outwith of these times, here are some of the best showers and their approximate peaks:
Mid August - Perseids
Late October - Orionids
Mid December - Geminids
NB - Note that outwith of the peaks you can still capture meteors, even weeks outwith the peak time. It is always worth going out to chase them, the will just be less frequently occuring.
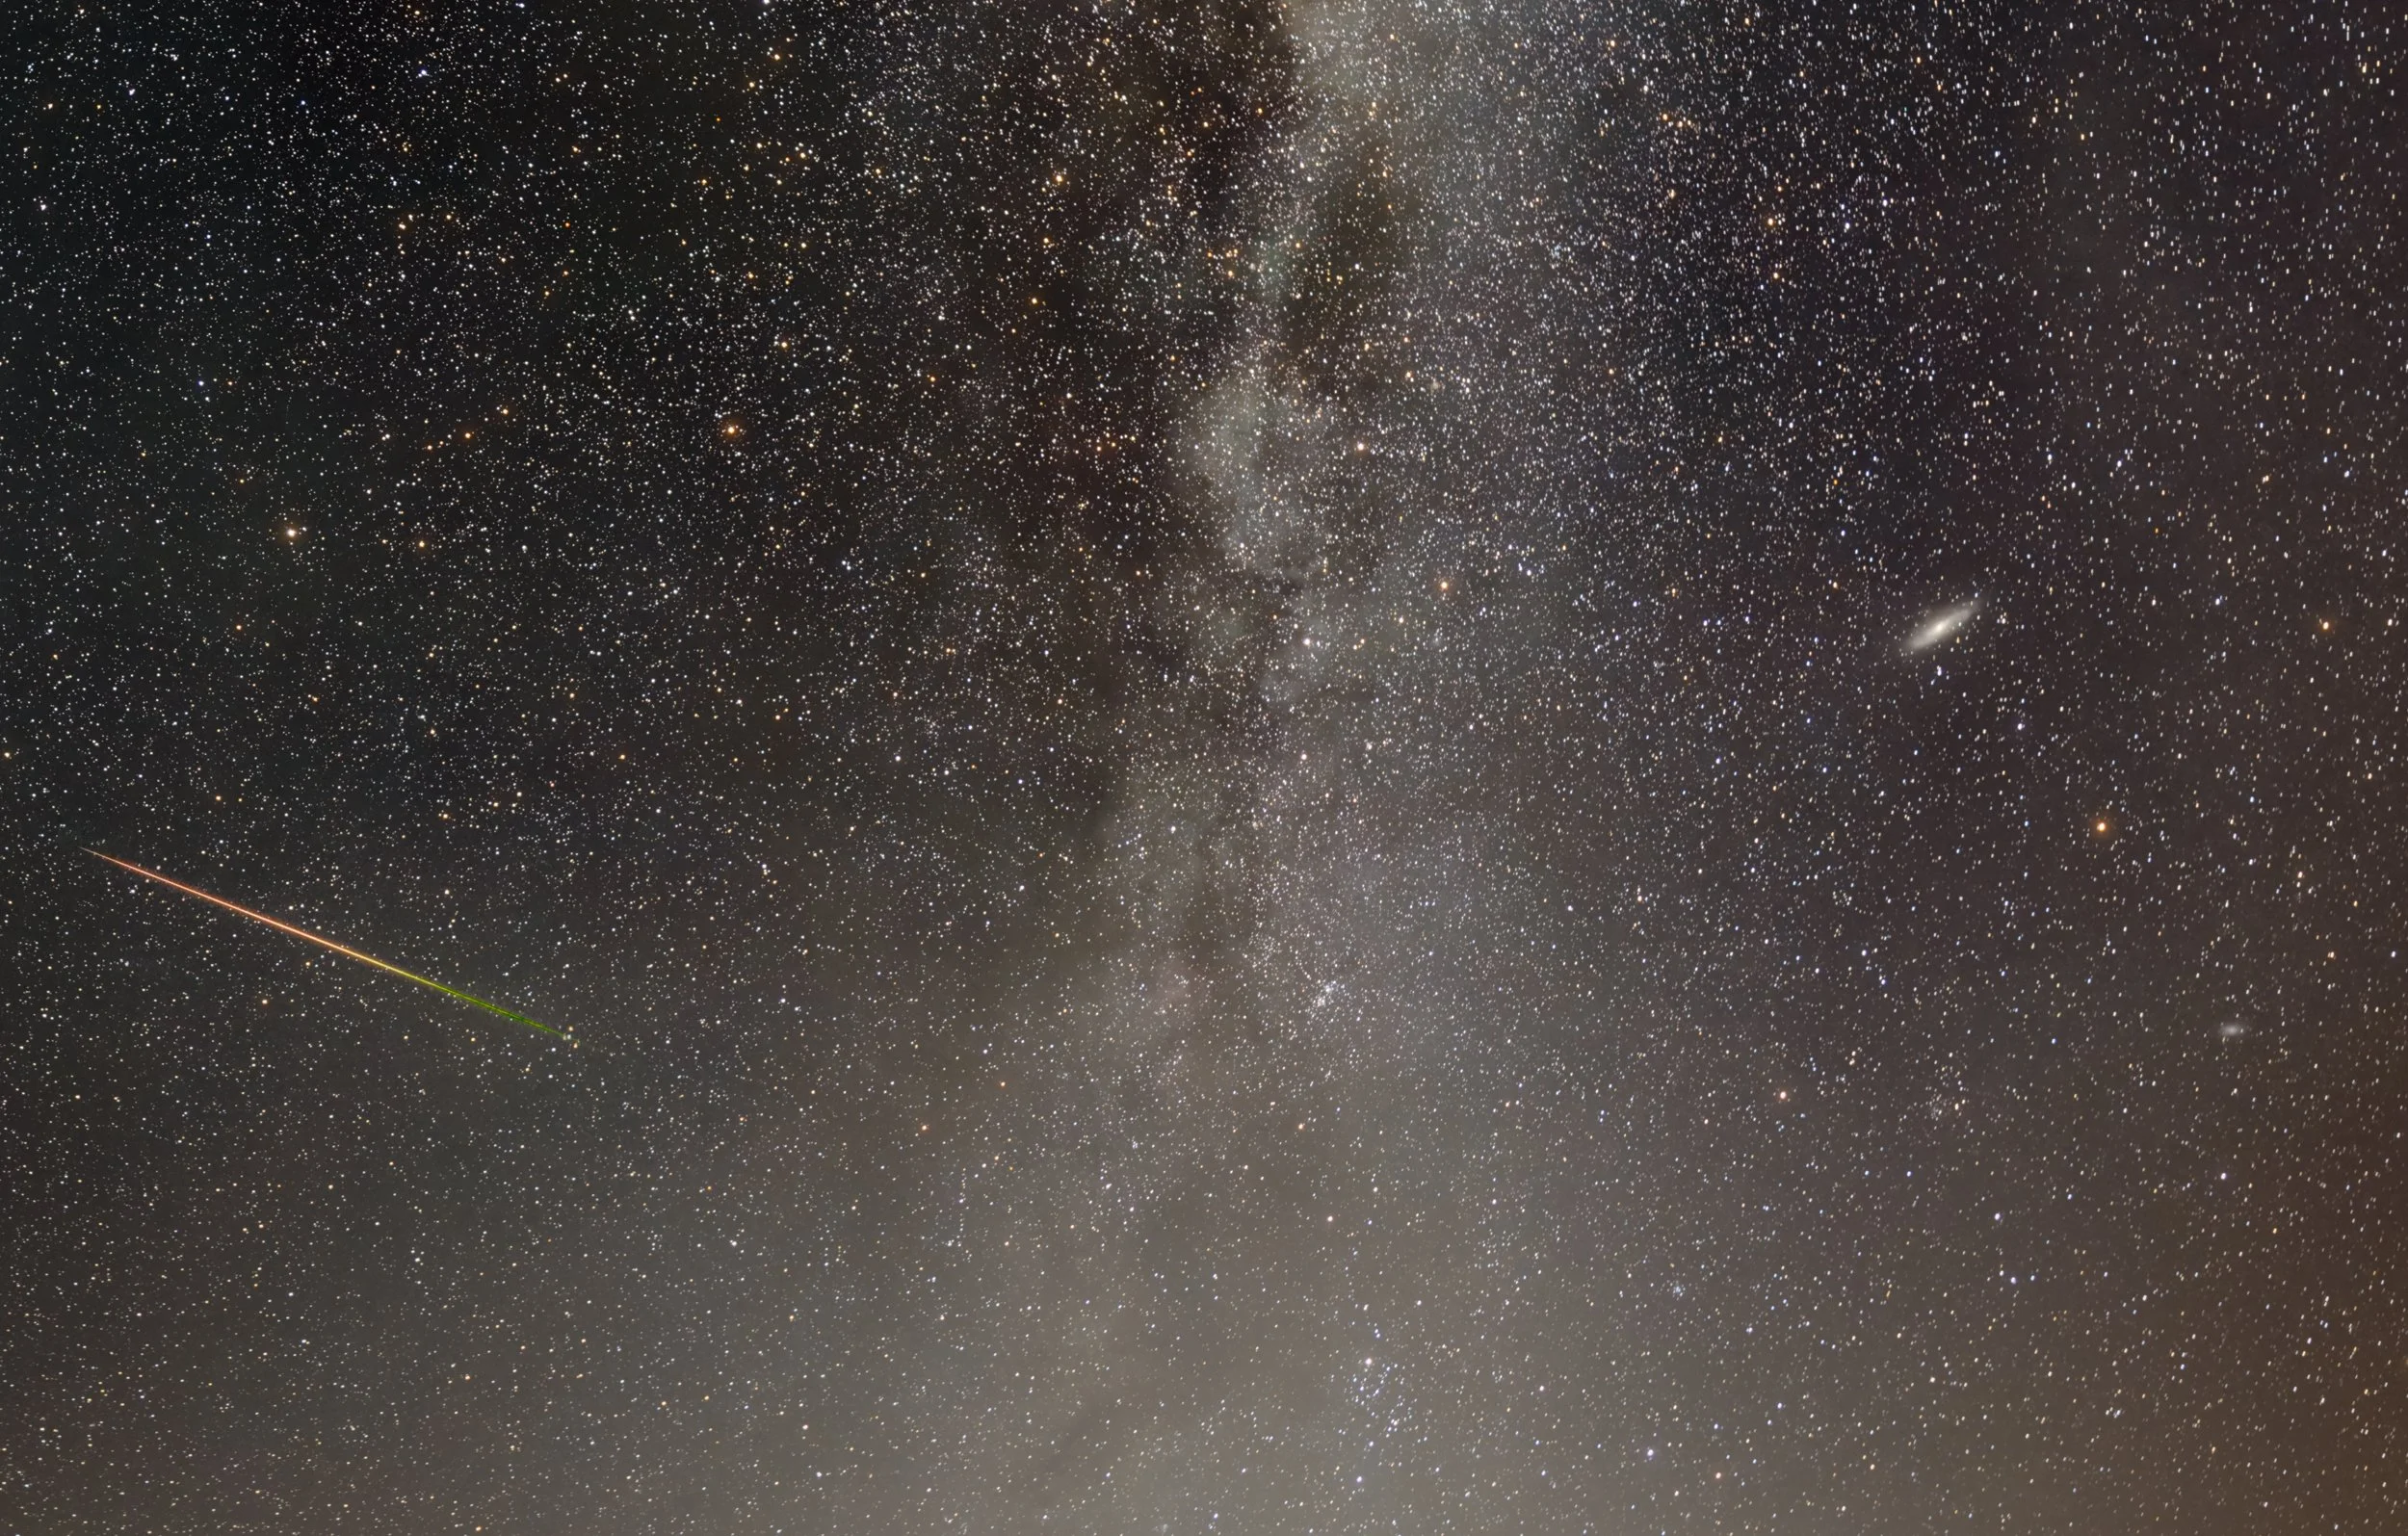
Perseid Meteor and the Andromeda Galaxy
Planning
It might sound obvious, however one of the most important items we need are dark skies. That means, ideally, being many miles from any large towns or cities when shooting the night sky. This will mean that more meteors have a chance of showing up in our pictures. It will also help us record more fain meteors in our pictures. It is useful to consult a light pollution map such as Blue Marble, which is based of satellite data. Shooting in dark areas will provide the best results, most vivid colours and detail. Now we need to find clear skies. I use a mixture of sources to best make an assessment of the situation. If you live somewhere that generates very mixed weather such as we get in Scotland, it can be clear 10 miles down the road and raining in your home town. I use various weather apps and the like to make an assessment of the situation. It is worthwhile having Clear Outside on your phone too. Next we need to consider the phase of the moon. Make sure the moon is small (ideally less than about 30% illuminated), or isn’t present in the night sky. This can easily be found from timeanddate.com. If the moon is up, it greatly hampers any attempted meteor photography, especially if it is approaching 100% illumination. This will make it very hard to record meteors or see them with the naked eye, or the camera. I am not a fan of attempting any meteor photography with moonlight over say about 30% maximum illumination. None is better and preferable. Finding the location of where meteors will appear in the night sky is something that comes with experience, however Stellarium is also another great app for planning your shoot. Meteors are named after their place of origin, called the radiant. This is because the actual meteors themselves will appear to radiate from this point in the sky. Thus, if the meteor shower is calling itself the Geminid’s, they are going to appear to be coming outwards in all directions from the Gemini constellation in the night sky. With the Perseids? You guessed it, they will appear to originate from the Perseus constellation. The Perseids are my favorite meteor shower in the northern hemisphere due to their strength around their peak. It is very unfortunate when the peak of a meteor shower strikes up near a full moon. Believe me, the moon is going to wreck a lot of your astrophotography, so get used to it early on! At the planning stage, note when the Perseus constellation is visible. In the northern hemisphere it is usually up most of the night. This will help you greatly for this particular meteor shower. Use the same principal for the respective meteor showers also.
Equipment
Fast Aperture Lenses
To capture meteors, we want the fastest lenses we have, and to keep things easier, a wider frame of view to begin with is best until we become proficient in capturing them. I recommend lenses no slower than an f/2.8 aperture, and ideally a lot faster. When shooting with limited light, it should be a given that we want to maximise light collection. There isn’t much light at night, so we can use large aperture lenses in order to help us out in that regard. See my gear page for some of the lenses and cameras that I personally use. In terms of light collection, some of the most efficient lenses are between 24-50mm and with an f/1.4 aperture. This is due to clear aperture size (the amount of light a lens collects is based on it’s aperture and focal length. We have to remember that aperture is a ratio, thus it is affected by the focal length of the lens. A 14mm 2.8 lens does not gather anywhere near the same amount of light as a 50mm 2.8 lens does, and generally speaking it will capture much less meteors than a longer, faster aperture lens will). To work out a clear aperture size for a lens, we take the focal length and divide it by it’s aperture. Thus:
For a 24mm f/1.4 lens we get:
24 / 1.4 = 17mm diameter of clear aperture
For a 35mm f/1.4 lens we get:
35 / 1.4 = 25mm diameter of clear aperture
Now let’s look at something that everyone jumps onto when shooting the night sky, be it meteors or the milky way. Ultra Wide Angle lenses. Now they can have some advantages, however, with regards to light collection, let’s look at the numbers:
For a 14mm 2.8 lens we get:
14 / 2.8 = 5mm diameter of clear aperture
Since clear aperture is a direct correlation of the light collection abilities of a lens, we can deduce that ultra wide angle lenses are not necessarily the best as everyone thinks they are. They collect ridiculously poor amounts of light compared to longer focal lengths. However, I hear you say, ‘they let me shoot for longer because the Earth is rotating,’ etc. Yes of course. They can partly compensate for apparent star motion. However, test out how many fainter meteors you can capture with a 24/1.4 or 35/1.4 lens and you will see what I mean here. Ignore star motion for a moment and take a 35/1.4 shot for 10 seconds, then take a shot with a 14/2.8 for 10 seconds. Notice how much darker than 14mm lens is, and if you where able to compare like for like, the 14mm shot will contain less meteors. For further reading on this subject, please see here. Using ultra wide angle lenses can cause other difficulties. They can be so wide, that even large meteors record on the picture in a very small angular size and do not appear very impactful. Longer focal lengths with wider apertures, will record fainter details as already noted here, and also record them larger within the frame. I use a 35/1.4 for meteor photography quite a lot. This is a good balance of a fairly wide field of view, and a great clear aperture size of 25mm for light collection. I also like using a 24/1.4. This has probably the advantage of a slightly wider field of view, despite being a smaller clear aperture size to the 35, it can increase the number of meteors caught because of the wider field of view (without being UWA). To record fainter meteors, do not deviate from wide open shooting with meteor photography.
Perseid Meteor Shower under 30% moon (off camera to right and setting). Notice how they have both come from the Perseus constellation on the right. NB sky appears blue due to Rayleigh Scattering (the sun’s influence on the night sky from reflected moonlight).
Camera
Technically any camera with a manual mode setting can be used to shoot the night sky. That said, to obtain the best quality; as well as using fast lenses noted above, we are best to use full frame cameras (35mm format cameras). These have less noise than smaller crop format sensors and are ultimately suited well to astro and aurora photography. Dslrs or Mirrorless cameras are perfectly fine to use. Often, the latest mirrorless cameras are much better in low light in terms of their ‘liveview’ function, or better termed, live sensor feed. Dslrs can be a little harder to compose and frame up shots at night as many aren’t as sensitive in low light and able to display what is in front of them in the dark in real time. Note that this makes absolutely zero difference to the final shot, this is only an aid in composing and focusing up (although admittedly, important concepts!). Ideally we want a camera with a tilt screen also. So in summary:
Dslr or Mirrorless full frame camera
Sensitive rear lcd monitor in low light (refresh rate drops in order to help this)
Tilt screen of some sort, ideally in both directions.
Other Essential Equipment
Headtorch with a Red Light Setting to protect night vision
Tripod with good overall stability and L bracket for camera
Lens warmer to prevent misting / condensation formation
Spare batteries and power bank to power lens warmer and camera if required
Intervalometer function on camera or remote if your camera cannot be used without one
On Location
So we have packed our bag and now arrived on location where we are going to be able to get a good view of the sky dome and the radiant of the meteor shower. The first thing we need to do is get setup and compose the scene. We connect the camera to the tripod, and intervalometer (or set this in camera), turn on exposure delay mode and try to capture a foreground and sky that is dynamic and works photographically. We can switch to a mode such as ‘Starlight View’ (Nikon), or turn on ‘Bright Monitoring’ (Sony). These will both slow down the refresh rate of the monitor and allow us to compose in the dark. Another option is to use video mode on your camera, set to 1/4 shutter speed and the widest aperture on your lens, with the camera set to a high ISO setting to enable you to clean up the live footage and compose. If you don’t have these functions, you will need to do test shots and check your composition before taking definitive pictures.
Camera Placement and Field of View
We can either be soley concentrating on the sky for meteors, and make our foreground image later, or we can use an ultra wide angle lens and try and get an all in one (which will of course require another ultra long foreground exposure later, if we wish the highest quality image). If the radiant happens to be fairly low on the horizon, it is still possible to use a 24/1.4, 35/1.4 or even a 50/1.4 prime lens, aimed at the radiant point and capture some fantastic meteors. Remember, that due to clear aperture size, ultra wide angle lenses will not record faint meteors, and meteors that they do record (especially next to the radiant) will be small an mostly unimpressive within the frame. Meteors originating from their respective constellations, will have very short tails with an ultra wide lens. The longer focal lengths are more difficult to work with, however are ultimately more rewarding. I’d recommend trial and error. See what works for you. Test out different focal lengths if you have them at hand. If you are using an ultra wide angle, or 20mm or wider, frame up away from the radiant point. This will help elongate the meteors you do capture and make them appear more impressive.
Achieving Perfect Focus in Astrophotography
Frame up, and once done, it is time to focus manually using live view by zooming into a bright star and taking a test shot. It is best to have the aperture wide open to increase light collection for this, and also bump the ISO up a little so that the camera displays a clearer image. If you are using one of the latest mirrorless cameras like the Nikon Z8 as I am, you will not need to do test shots; the monitor is so sensitive you will see when you reach perfect focus very clearly. This is because the new mirrorless cameras use a slower refresh rate at night, thus more light hits the sensor and builds a better, more detailed, and less noisy image to aid in focusing. It might sound small, however on freezing cold nights when you want to start imaging, this can be a real boon to the astrophotographer. Do not rush this part; it will save the headache of a wasted time under dark skies to reveal out of focus shots headed for your recycle bin. To achieve perfect focusing here is the scoop. Zoom to maximum magnification over a bright star on your mirrorless or dslr monitor. Use a small autofocus point in order to do so, however all that really matters is we enlarge a star as much as possible. Usually I would suggest about 1/3 in from frame edges to account for field flatness, unless you have a truly flat field lens (there not many about if speaking about wides - which means you need to avoid focusing in the centre or right in the corners to balance aberrations within the frame on the starlight). Pull the focus ring until best balance of aberrations occur (technically the size of star should be as small as possible, take note of the purple or green tinge ring around the star in question as you manually focus back and forth slowly and gently, and lastly observe the size of the coma and astigmatic aberrations on the stars. Coma is literally when the starlight is elongated into a comet-like shape. Astigmatic lenses produce winged, seagull-like stars in the mid frames and corners of images. It’s at this focusing stage, you can try to mitigate and balance this out. Remember that of course, stopping down at least one or two stops will greatly reduce these problems - which is again why we use star trackers for serious astro photography work. Check between the centre and edges after pulling focus to this star about 1/3 in. Adjust if necessary. NB - Focus will need to be checked periodically during the night, using the same process mentioned above. This is especially important if there has been a shift in temperature. Do not listen to anyone telling you that you simply place your lens to the infinity symbol. This is a very rudimentary and often inaccurate way of focusing at night that will likely lead to blurry and mediocre results.
Monitor Brightness
One of the biggest pitfalls of obtaining good exposure levels at night and in astro photography is having the LCD monitor (or viewfinder brightness) of the camera up at extremely high levels for low light. Brightness and exposure are different things entirely (we won’t get too deep into this topic right now, that is for another day), however having the monitor up at it’s maximum brightness for example, will mean that the files will appear extremely dark when we observe them on our editing monitors after the fact. For this reason, it is extremely important that we shoot at very low level brightness for this specific task. If the camera you are using has a warm ‘red’ display mode, turn it on, and drop it’s brightness down (perhaps after focusing) and then try to leave it there. If the camera that you are using doesn’t have this mode and uses the normal white bright lettering on the display, it is important to knock that right down to protect dark adapted eyes, and also prevent the potential for underexposure. Use the histogram to determine exposure, not the brightness of the LCD monitor.
Image Taking Settings for Meteor Photography
So let us begin. Place the camera into Manual shooting mode, so that we can control everything. Make sure you are shooting in full RAW format, with no or lossless compression set, and set lens corrections to off, along with long exposure noise reduction. Set the white balance to 5000K manually or select daylight white balance. Turn on exposure delay mode, connect a remote release if required. Make sure you have manually focused as per the method described in this guide. This next part is very important. Do not stop down at all. Use the widest aperture possible. F/1.2-f/1.8 is best. This will mean that stars on the periphery might have some aberrations affecting them, but it won’t really affect the meteors, and it will record many more faint meteors than stopping down. Do not stop down, except if you have a star tracker and you want to take another shot of the background stars stopped down to clean up the edges and corners a bit later on. Depending on the focal length of the selected lens and it’s maximum aperture:
The aperture set as wide open as possible for the specific lens, f/1.2 - f/2.8
The shutter speed set anywhere between 5 to 20 seconds
The ISO set to 1600. (Increasing the ISO beyond this point just reduces dynamic range)
Star Tracker Use in Meteor Photography
Meteor photography can be done with a static tripod and a fast wide to moderate telephoto lens (or longer). However, it is in some ways better and easier on a star tracker as we can leave it running for long periods with less gaps between each exposure where we could miss a meteor that passes above us. This is particularly helpful if we are pointing our camera straight up, or at a high angle, towards out radiant point with no interest in the foreground at all. This means we can capture much longer exposures of the surrounding starlight and end up with a high quality picture. This also has the advantage, that we can composite every meteor that appears over the whole night into one frame, constructed from every individual exposure that caught a meteor. Be careful not to stop down; as we would normally on a star tracker mount. If we do so, we lose that clear aperture advantage. I recommend to keep the lens wide open. This will gather more light, and record fainter meteors. We can simply take a small stack of the background stars later, stopped down to improve image aberrations if we want.
Star Tracker and Mosaic Making
Another boon with a star tracker is we can make a panoramic image, better termed a mosaic of the night sky. Lenses such as a fast 35/1.4 can be used to take several frames of each portion of the sky. They can be averaged from each frame (called stacking) and each frame joined together until we include an expansive view of the night sky above us, in a sort of jigsaw puzzle of sorts. (You could also just take a singular frame of each sky portion which I find works well). You might ask, well why go to that bother, why not use just a 14mm lens and get it all in one shot? Yes, of course you can. However, you will not record the same detail as is possible with a longer fast lens, meteors that you do capture will be in all likelihood very small in the frame and the number you capture will be significantly lower due to smaller clear aperture size of such a wide lens.
These two fellas are Satellites, not Meteors.
Meteors vs Satellites
It can be easy to get excited and assume any bright streak across our picture is a meteor. Whilst it is possible that what you are seeing is a meteor, there is many satellites in our night sky these days and I will explain how to tell them apart. A satellite trail will often be consistent and appear in multiple exposures. E.g. it might show up in the first 10 second exposure, then the next and the next. If you join up the lines the satellite has made in the sky, we can see that apart from the small spaces between exposures, they are not meteors because they are moving much slower in comparison, slow enough to be able to show in several shots. The other obvious sign that you have captured a satellite and not a meteor, is the are generally white in colour and further to this, some can also have flare points on them called iridium flare. This is an old type of satellite being phased out that has a high reflectance; capturing the sun’s light and sending it down into our lens as you can see in the above image. The last and final giveaway that these are satellites is that they are crossing each other; therefore they could not have originated from a radiant of equal origin in the night sky.
Meteor Spears Auriga. 24mm lens on a star tracker, 5 minute sky exposure picked this faint one up
The above picture was made using a star adventurer star tracker mount (pictured in the foreground). The meteor shows up faintly, however I was imaging at f5 (I should have sufficed with f/3.5 - f4 maximum actually). This is a good example of aperture. If I had been using f/1.4-2 this meteor would have appeared many times brighter than you see here. The reason I was shooting so stopped down was, that I was experimenting with how good I could get the stars to be. Such testing has proved the best for this lens is about f/3.5-4, however I am very picky). So yeah, I wasn’t planning to photograph a meteor, although as you will come to realise, it is always a nice surprise when one shows up. In this picture, notice how nice and round pinpoint the stars are right out to the edges and corners. That’s exactly why I am stopped down in my testing. Wide open shots on fast wide primes will often make these stars a bit wonky to say the least, however lenses are improving all the time and aberration control is getting better closer to maximum aperture. Professional looking astrophotography pays attention to such things. This is of course another way we can differentiate ourselves - the overall image quality from the data we can collect. (This, and not making every image bright blue or purple…).
Processing Meteor Photography
I have previously given some guidance on shooting and processing aurora and milky way pictures, the techniques are similar and shared to this genre of night sky work. Essentially as before, we have options. It really depends what you want the final output to look like. Are we just processing a deep sky shot of a meteor with no foreground? If so, look at my deep sky astrophotography processing guide. If we are including a foreground, there are many ways to tackle that. The simplest would be capturing everything in one field of view, either a singular sky and land shot (a sky stack is better, to average noise and increase colour/detail). The foreground will require an ultra long exposure 4-5 times the length of the sky exposure most times:
Perseid Meteor and Andromeda Galaxy, stacked sky, single view, camera position unaltered between exposures of land and sky. This was taken with a 14mm 1.8 lens.
The processing of the above picture followed along the lines of my deep sky astro processing. I stack the sky exposures together, import them to photoshop and stretch them whilst using curves to elimiate sky glow. I continue to stretch and colour correct the file, whilst adding delicate amounts of global contrast and clarity. I do not dodge and burn local areas. This makes the milky way look like it is lit up like a torch or light - something I see a lot of on the internet. Stretching globally achieves a much more natural result, in doing so properly we dig out all the faint signals present in our file, rather than just randomly painting a positive exposure over the central milky way which looks amateur. I add a mild vignette, apply mild noise reduction then blend the foreground into the sky. NB: This is a singular field of view with no movement in camera position. The sky was a 12 exposure stack.
Another option is capturing a meteor above the horizon in an independant sky shot, then taking another frame of the land below it. (see the picture ‘Meteor Spears Auriga’ - which was produced using this technique, a sky and land exposure in a vertical mosaic). The most adventurous and difficult way of going about this is as mentioned previously, make a panorama, or better called mosaic. Each sky frame can be stitched to form a huge field of view. Meteors can be composited into the shot in the locations they appeared. This involves making selections and some more complex editing. See here for an example of how this meteor mosaic can look. Now this is a very eloquent (and advanced) example of this type of shooting - however it is all attainable with practice in this craft. Lighten blend mode in Photoshop is very useful to bring all the meteors which we select from the individual frames back into one final image. In this case, Dr Clark has used several different cameras and lenses to build this composite. As you can see, it is a fantastic result. You can make it as simple or as complex as you like. A simpler version of this would be to use one lens, aimed near the radiant and just shoot for hours, to see how many meteors that are captured. The background stars will appear to move and then afterword in processing we can composite them to where they should be in one final image. Don’t forget to take a second foreground shot for the composite, either at the start of end of the imaging session, or when the meteors go quiet for a bit.
Closeup of the above shot. Perseid and Andromeda Galaxy
If you view this crop full screen, you will notice how clean the file is (please bare in mind that the resolution is reduced for the internet of course). The reason the end result is so clean and detailed, is due to stacking and some careful editing to preserve the natural colour of the night sky and it’s meteors.
This page is being continually developed and expanded. Last updated 3rd Jan 2025