Milky Way Photography
Milky Way over Dunnottar Castle
Introduction
In this guide you will learn how I approach shooting and editing images of the Milky Way.
Seeing is Believing
Our eyes can interpret only 0.0035% of the electromagnetic spectrum. This phrase was never meant to apply to the night sky. We don’t see half of what is lurking up there in our beautiful cosmos, however we can begin to see a glimpse if we try to adapt our eyes for the night. In this game, it is best to leave misconceptions about our own eyes being truth-seers at the door and open our minds to what could be out there, and what is out there.
Dark Adaption
It takes the average human eyes about 45 minutes to become dark adapted, however studies show that improvements in night vision can occur for up to two hours! We don’t see much at all at first when looking at our starry night skies, even in ultra dark locations (which are very rare in today’s world). However, our eyes are capable of seeing fainter detail, light and colour if we allow them time to adapt to the darkness. The purkinje effect describes the situation in human vision: as light levels decrease, the perception of warm colour drops, especially the red end of the spectrum. It is very important to observe the night sky with dark adapted eyes for this reason. To properly have your eyes adjusted for light levels this low, one must observe for at least 30 minutes and avoid all forms of artificial light during that time. This is a much longer time than most people give it. This is why many struggle to see the Milky Way, or other detail in the night sky. One of the other major points to this would be observing from a location that has poor quality dark skies. We will get to this shortly…
Planning
It might sound obvious, however one of the most important items we need are dark skies. That means, ideally, being many miles from any large towns or cities when shooting the night sky. This will mean that more of the milky way has a chance of showing up in our pictures. It is useful to consult a light pollution map such as Blue Marble, which is based of satellite data. Shooting in dark areas will provide the best results, most vivid colours and detail. Now we need to find clear skies. I use a mixture of sources to best make an assessment of the situation. If you live somewhere that generates very mixed weather such as we get in Scotland, it can be clear 10 miles down the road and raining in your home town. I use various weather apps and the like to make an assessment of the situation. It is worthwhile having Clear Outside on your phone too. Next we need to consider the phase of the moon. Make sure the moon is small (ideally less than about 30% illuminated), or isn’t present in the night sky. This can easily be found from timeanddate.com. If the moon is up, there isn’t much we can do Milky Way wise, especially if it is approaching 100% illumination. This will make it very hard to see the Milky Way with the naked eye, or the camera. I am not a fan of attempting milky way photography with moonlight over say about 30% maximum illumination. None is better. Finding the milky way in the night sky is something that comes with experience, however to begin with google earth is very good at showing where the milky way will be a ta certain time and latitude throughout the season. Stellarium is also another great app for planning your shoot. Many people swear by photopills, however I am less than impressed by it. Yes it can show the milky way position in real time; but it’s not that it currently shows what it will be like at the location you will be shooting at. It just shows where it would be in your living room at the chosen time! This isn’t any more useful to me than what Stellarium provides, so for the most part, I use it alone. I have contacted the makers of photopills and my real time landscape suggestion is coming - for the last 2 years now.
The Faint North Tail of the Milky Way too often get's overlooked
Equipment
Fast Aperture Lenses
To capture the Milky Way, we want the fastest lenses we have, and to keep things easier a wider frame of view to begin with is best until you become proficient in capturing the night sky. I recommend lenses no slower than an f/2.8 aperture. When shooting with limited light, it should be a given that we want to maximise light collection. There isn’t much light at night, so we can use large aperture lenses in order to help us out in that regard. See my gear page for some of the lenses and cameras that I personally use. In terms of light collection, some of the most efficient lenses are between 24-35mm and with an f/1.4 aperture. This is due to clear aperture size (the amount of light a lens collects is based on it’s aperture and focal length. To work out a clear aperture size for a lens, we take the focal length and divide it by it’s aperture. Thus:
For a 24mm f/1.4 lens we get:
24 / 1.4 = 17mm diameter of clear aperture
For a 35mm f/1.4 lens we get:
35 / 1.4 = 25mm diameter of clear aperture
Now let’s look at something that everyone jumps onto when shooting the milky way. Ultra Wide Angle lenses. Now they can have some advantages, however, with regards to light collection, let’s look at the numbers:
For a 14mm 2.8 lens we get:
14 / 2.8 = 5mm diameter of clear aperture
Since clear aperture is a direct correlation of light collection, we can deduce that ultra wide angle lenses are not necessarily the best as everyone thinks they are. However, I hear you say, they let me shoot for longer because the Earth is rotating, etc. Yes of course. That can partly compensate for ‘apparent’ star motion. However, test out how much brighter faint aurora comes out with a 24/1.4 or 35/1.4 lens and you will see what I mean here. For further reading on this subject, please see here. Only using an ultra wide and no other lens will limit compositions and the types of picture you can eventually make, however they are probably the best types of lens to use initially and learn with, even despite the caveats above, they are generally quite forgiving and easy to use. I think it is important to understand a topic as deeply as possible. If we can understand why we are doing something; we learn much better techniques, and we grow and develop accordingly.
Camera
Technically any camera with a manual mode setting can be used. That said, to get the best quality, as well as using fast lenses noted above, we are best to use full frame cameras (35mm format cameras). These have less noise than smaller crop format sensors and are ultimately suited well to astro and aurora photography. Dslrs or Mirrorless cameras are perfectly fine to use. Often, the latest mirrorless cameras are much better in low light in terms of their ‘liveview’ function, or better termed, live sensor feed. Dslrs can be a little harder to compose and frame up shots at night as many aren’t as sensitive in low light and able to display what is in front of them in the dark in real time. Note that this makes absolutely zero difference to the final shot, this is only an aid in composing and focusing up (although admittedly, important concepts!). Ideally we want a camera with a tilt screen also. So in summary:
Dslr or Mirrorless full frame camera
Sensitive rear lcd monitor in low light (refresh rate drops in order to help this)
Tilt screen of some sort, ideally in both directions.
Other Essential Equipment
Headtorch with a Red Light Setting to protect night vision
Tripod with good overall stability and L bracket for camera
Lens warmer to prevent misting / condensation formation
Spare batteries and power bank to power lens warmer and camera if required
Intervalometer function on camera or remote if your camera cannot be used without one
The Winter Constellations over the Isle of Skye Scotland. 10 stacked sky pictures, with one ultra long foreground exposure. NB Airglow causing a green colour in this image.
Image Stacking Technique
Basically there are two main ways to tackle milky way photography. We either take a singular picture (not recommended) and a singular foreground exposure, process both independently and blend them, or we use an ammended version of this method, meaning we take 9-10 images and stack them together. The second way is to use a Star Tracker Mount, to allow for longer exposures. The first technique I want to discuss is the easiest and most readily available to anyone with a camera, wide angle lens and a tripod. Enter the image stacking technique. Many years ago I used to take singular pictures and process them, however I quickly noticed that stacking could easily one-up these types of pictures in terms of colour, detail and overall polish, because this method averages out image shot noise present in the low light conditions we find ourselves in photographing the milky way. If we can take, say 10 individual pictures of the sky at the scene, with an ultra long foreground exposure of the landscape below, we can stack those pictures together to reduce noise, and up details with overall better image fidelity.
Star Tracking Technique
The second, more complex technique (which admittedly produces higher quality results), is the star tracking technique. Technically speaking this phrase is a misnomer; because we know that the stars are not in motion relative to us; it is Earth’s motion we seek to cancel out by using an equatorial mount. This method of course requires this additional piece of equipment, so it is never the first method that you would naturally choose. You already own the camera, lens and tripod, so you should always cut your teeth on the first method mentioned here. With the star tracking technique, we can expose for many minutes at a time or even longer. To give you an idea, it is easy to get a 5-6 minute exposure of the night sky at 14mm with a star tracker. Just think how much more light I can collect with a star tracker, vs being limited to a 20 second exposure of the night sky. We can use lower ISO’s with this technique too (although as I will advise later on in this series, there are some important nuances that you should be aware of and understand when it comes to too low of an ISO and astrophotography).
Loch Thom, West Scotland. Nikon D850, Sigma 35mm f/1.4 Art lens on a star tracker mount - Image is a mosaic of about 15 pictures
On Location
So we have packed our bag and now arrived on location where we are going to be able to see the milky way. The first thing we need to do is get setup and compose the scene. We connect the camera to the tripod, and intervalometer (or set this in camera) and try to capture a foreground and sky that is dynamic and works photographically. We need to ensure the camera is level also. We can switch to a mode such as ‘Starlight View’ (Nikon), or turn on ‘Bright Monitoring’ (Sony). These will both slow down the refresh rate of the monitor and allow us to compose in the dark. Another option is to use video mode on your camera, set to 1/4 shutter speed and the widest aperture on your lens, with the camera set to a high ISO setting to enable you to clean up the live footage and compose. If you don’t have these functions, you will need to do test shots and check your composition before taking definitive pictures.
Achieving Perfect Focus in Astrophotography
Frame up, and once done, it is time to focus manually using live view by zooming into a bright star and taking a test shot. It is best to have the aperture wide open to increase light collection for this, and also bump the ISO up a little so that the camera displays a clearer image. If you are using one of the latest mirrorless cameras like the Nikon Z8 as I am, you will not need to do test shots; the monitor is so sensitive you will see when you reach perfect focus very clearly. This is because the new mirrorless cameras use a slower refresh rate at night, thus more light hits the sensor and builds a better, more detailed, and less noisy image to aid in focusing. It might sound small, however on freezing cold nights when you want to start imaging, this can be a real boon to the astrophotographer. Do not rush this part; it will save the headache of a wasted time under dark skies to reveal out of focus shots headed for your recycle bin. To achieve perfect focusing here is the scoop. Zoom to maximum magnification over a bright star on your mirrorless or dslr monitor. Use a small autofocus point in order to do so, however all that really matters is we enlarge a star as much as possible. Usually I would suggest about 1/3 in from frame edges to account for field flatness, unless you have a truly flat field lens (there not many about if speaking about wides - which means you need to avoid focusing in the centre or right in the corners to balance aberrations within the frame on the starlight). Pull the focus ring until best balance of aberrations occur (technically the size of star should be as small as possible, take note of the purple or green tinge ring around the star in question as you manually focus back and forth slowly and gently, and lastly observe the size of the coma and astigmatic aberrations on the stars. Coma is literally when the starlight is elongated into a comet-like shape. Astigmatic lenses produce winged, seagull-like stars in the mid frames and corners of images. It’s at this focusing stage, you can try to mitigate and balance this out. Remember that of course, stopping down at least one or two stops will greatly reduce these problems - which is again why we use star trackers for serious astro photography work. Check between the centre and edges after pulling focus to this star about 1/3 in. Adjust if necessary. NB - Focus will need to be checked periodically during the night, using the same process mentioned above. This is especially important if there has been a shift in temperature. Do not listen to anyone telling you that you simply place your lens to the infinity symbol. This is a very rudimentary and often inaccurate way of focusing at night that will likely lead to blurry and mediocre results.
Monitor Brightness
One of the biggest pitfalls of obtaining good exposure levels at night and in astro photography is having the LCD monitor (or viewfinder brightness) of the camera up at extremely high levels for low light. Brightness and exposure are different things entirely (we won’t get too deep into this topic right now, that is for another day), however having the monitor up at it’s maximum brightness for example, will mean that the files will appear extremely dark when we observe them on our editing monitors after the fact. For this reason, it is extremely important that we shoot at very low level brightness for this specific task. If the camera you are using has a warm ‘red’ display mode, turn it on, and drop it’s brightness down (perhaps after focusing) and then try to leave it there. If the camera that you are using doesn’t have this mode and uses the normal white bright lettering on the display, it is important to knock that right down to protect dark adapted eyes, and also prevent the potential for underexposure. Use the histogram to determine exposure, not the brightness of the LCD monitor.
The colour of the Night Sky
I am going to teach how I learned, using the proper settings. Feel free to trial different white balance settings, however daylight white balance - circa 5000-5500K is the correct white balance for the night sky, as confirmed by science (spectral analysis of starlight). Many struggle with this; they don’t reconcile that the natural colour of the night sky is a burnt brown-orange, even in areas with zero light pollution: there will be this colour toning. The reason many websites fall into the inaccuracy of advising the use of white balances’ such as 3000K, is that they are trying to get the night sky to look as we see it (or actually, rather any colour apart from the dusty brown colour). We have grown up exposed to this blue sky, bright green aurora / milky way problem. Even looking at children’s books - they depict pictures of blue night skies with twinkling stars. But wait, it gets even worse. I have even noticed on some BBC documentaries from some prominent scientists’ have them parading blue sky milky way shots at us. They really should know better to perpetrate such myths, especially on a programme about astro physics! Let me hit you with reality and show you how the night sky really is:
The Milky Way and Constellations. 24mm f/1.4 lens shot at f/4 for 4 minutes, ISO 400 Nikon D850
I can already feel the aversion to this. However it is reality, and I do quite like it. It definitely makes your pictures stand out. A very easy way to do so in this game because most are obsessed with fantasy when it comes to astrophotography.
Purkinje Effect
As I touched on previously, due to what’s called the purkinje effect, our own human vision is very poor at night at seeing colour. The peak sensitivity of our human vision in extremely low light tends to skew hard towards the blue end of the colour spectrum. Beyond this, when light levels really drop through the floor, our human vision sees very little colour at all. Warm colours register with our eyes much less than cooler colours do; hence the shift is blue-green in our colour range dissemination. As I alluded to previously, this all means that seeing really isn’t believing. Remember that our eyes see less only 0.0035% of the electromagnetic spectrum! This is why when it comes to subjects like this, we don’t use our eyes to confirm such things. Let me know if you’ve ever spotted any x-rays, gamma rays or if you have ever seen infrared light (edit please do not email me about this if you have, thank you)…
In summary of this subject; which I will touch on in greater detail on my blog, the vast majority of shooters are using cooler white balances to skew the night sky towards blue which it never is on moonless nights. There are way more inaccurate astro images online than accurate, in terms of actual colour representation of the night sky most shots are a fantasy. People just do not like the dusty brown orange in nature. However, it is reality. You can apply this to aurora shooting too. Because there are so many people using improper colours for the aurora images; achieving unnatural deep blues and greens in their images, it can actually make yours stand out amongst a sea of faked - blue images we see online.
So now we have a bit of a greater understanding about colour, let’s talk about shot taking.

Milky Way over Dunnet Head - The Most Northerly point in Scotland and the British Isles. 35mm f/1.4 Sigma Art (Now Tamron).
Image Taking Settings for Milky Way Photography - Image Stacking Technique
Let’s first discuss when to use this technique. The reasons can be manyfold:
There is a great deal of wind making star tracking problematic
You are freezing and cold / energy depleted and just want to grab the shot and go home
You are a relative beginner and this is a first foray into this genre of photography
You don’t own a star tracker
Clearly, there isn’t much we can do for the final point there. The point before, considers that it is best to walk before we run. The first two points are good considersations. I don’t track in high winds - the chances of blur / accidents / breakages to equipment greatly increase. If I am freezing, I also sometimes stack too. So even knowing how to do the technically better method of star tracker use, still means I dip back into this method. For this reason, it is crucial to know how to adopt it in your shooting.
So let’s begin. Put the camera into Manual shooting mode, so that we can control everything. Make sure you are shooting in full RAW format, with no or lossless compression set, and set lens corrections to off. Set the white balance to 5000K manually or select daylight white balance. Depending on the focal length of the selected lens and it’s maximum aperture:
The aperture set as wide open as possible, f/1.2 - f/2.8
The shutter speed set anywhere between 10 to 20 seconds
The ISO set to the gain point of the camera, or the most efficient ISO*
*I am teaching the proper way of shooting the milky way with these settings. I do not want to dumb this guide down. Many tutorials will instruct you to simply keep increasing the ISO of the camera until the taken image looks ‘bright enough’ or ‘properly exposed’. This is a fallacy, and an oversimplification of what is occurring when we use a camera at night. The only two things that affect exposure at night are aperture and shutter speed. Most modern cameras are ISO invariant. This means, upping the ISO in camera is the same as just lifting the exposure in post processing in terms of noise that will result in doing so. So the reason we want to leave the ISO lower at the scene, is because lower ISO’s have greater inherent dynamic range. If we shoot at ISO 3200 for example, we might have several stops less dynamic range than if we shot at ISO 500 as I do with the Nikon Z8, and simply boost the exposure to where we require in post. We can find the best place to shoot for our particular camera by using photonstophotos.net. If you aren’t too technical yet, simply shoot at a moderate ISO. I suggest ISO 800. Do not go near crazy high ISOs such as 6400. Now we want to start taking images. We can set the intervalometer up to do this, or connect a remote into the camera to do the same if your camera does not have this function.
Experimentation
In order to find out how long of a shutter speed you can effectively use on the milky way for your lens, you could consult the internet and find some fancy tables with certain rules that give a general guide - or you could just shoot and find out. It’s much quicker! Some rough guides -
a 14mm lens on a full frame camera for stacking, easily can do 15-20 seconds and get minimum star trailing. If stacking, it is best to keep this to the lower end of this so that no trailing occurs. The images will look dark, however we will stack many together to build up our exposure and reduce noise. A faster aperture can help a lot here.
a 35mm lens on a full frame camera for stacking, 7-9 seconds maximum with a fast aperture like f/1.4. Slower apertures will involve stacking more images to build up more signal, whilst keeping the exposures short enough to avoid star trailing on hte resulting stacked images.
a 50mm lens (where stacking basically tops out - longer focal lengths will need such short exposures it becomes too problematic), we can do about 6-7 seconds on a full frame camera.
Remember, that all of this will depend on sensor resolution. 45 Megapixels will show more trailing than 24 Megapixels will. Another factor that influences star trailing is the direction of shooting the night sky. If we are shooting further from polaris, the stars will have greater relative motion compared with Earth, and trailing will show up in a bigger way. This is why I highly recommend experimenting, with the caveats I have explained so far in this guide. Forget the rules, take test shots and then examine them in the centre, midframes and corners. Is that amount of trailing acceptable to you? Good, we are happy with our taken shots!
Foregrounds with the Stacking Method
Of course, it is possible to take those 10 or so shots taken at the scene, and stack them through an image stacking program like Sequator, Starry Landscape Stacker or even Photoshop, using them as the foreground also. The software can average the shots and often produce a pretty good result for the night sky, and the foreground. However, old habits die hard, and before stacking became the way to do things with regards to the night sky, most of us took an ultra long exposure of the landscape and blended it to the sky image. Infact, an even better way sometimes, is to take a couple of ultra long exposures of the landscape and blend those. If you took x3 5 minute exposures, are you are really going to get smooth results. You can appreciate though, how quickly time under dark skies can vanish when out shooting the milky way. We just spent 15 minutes taking a foreground shot on it’s own! We need to weigh things up and balance time vs shots. I do not do this all the time. Most of the time, one decent ultra long exposure of the foreground, for me, beats using the stacked shot that I use for the sky. I recommend, always going for that one superb un-repeatable shot over lots of lower quality ‘snaps’ - I am sure you will agree. It might feel strange coming back with only one great picture, however in time you will come to realise it is the best way.
14mm, ISO 800, 120 second exposure for the foreground of the image shared previously
For this particular picture, the real reason I used the stacking method is that I forgot my star tracker batteries. (Note to self: add this reason to the previous list). I should have doubled the exposure time to 4-5 minutes for here. It was so dark I could not see my hand in front of my face in the foreground area. I have lifted the exposure here to show the cleanness of the foreground. Notice the strong star trailing. We obviously would not consider this a useable sky exposure. 2 minutes is far too long, unless we have a star tracker…
Milky Way Core over Scotland in 2024. A 50mm f/1.4 lens picture built off of a huge mosaic of images
Image Taking Settings for Milky Way Photography - Star Tracker Technique
Again, let’s first discuss when to use this technique. The reasons can be manyfold:
It is a quiet, calm evening with no wind and perfect shooting conditions
You are comfortable, it is either warm out, or you are warm within your many layers of clothing and ready to go
You have more experience and are ready for a greater challenge with a greater image quality as a result
You have tested the equipment in your garden
Use of a star tracker is a technique that is highly advantageous for the astrophotographer. I have personally met plenty of shooters who have resisted this technique despite my recommendations to them. Nearly all of them eventually see the light and adopt it’s use in some form.
Polar Alignment
In order to use our star tracker to shoot the milky way, we must align it to a point of zero rotation as to allow us to take ultra long exposures of the apparent moving star background in the night sky. Polar alignment can be a daunting task to carry out on a cold night; however like anything, if we break it down it can be learned and practiced until it can be carried out quickly and accurately. Initial polar alignment is carried out before we frame up to our target. The Star Adventurer Star Tracker which I use comes with a separate plastic polar scope, which can be connected into the body of the star tracker in order to align the mount to the North Celestial Pole (NCP) or the South Celestial Pole (SCP). In the northern hemisphere this is much easier because the NCP is very close to the north star called Polaris. The true zero axis is just slightly outwith this star in the night sky, hence we need to use our latitude on Earth and the Star Adventurer (or other app) to locate which position to place Polaris within the reticle to achieve perfect polar alignment.
Comet A3 and the Milky Way over Loch Tummel, Scotland
Star Tracker Camera Settings
Remember the starter settings I advocated for the image stacking technique earlier?
The aperture set as wide open as possible, f/1.2 - f/2.8
The shutter speed set anywhere between 10 to 20 seconds
The ISO set to the gain point of the camera, or the most efficient ISO*
These change a bit when we have our camera mounted to a star tracker. No longer are we constrained by the limits placed on us by a static tripod, we can now enter several minute exposures and more. This brings me nicely to another, very important point and reason why this method of shooting the night sky is vastly superior to the stacking method. With the stacking method, we are limited to wider apertures. We need to collect light, and we are exposure-length limited, so we must use aperture effectively with the stacking method. It changes when we use a star tracker. Now that we can take several minute exposures, we can stop the lens down one to two stops or more. Now you might be thinking, why would I want to do that, I’ve just bought this fast lens and I want to use it wide open! Steady on there grasshopper; because there are reasons, and they are called lens aberrations. Lens aberrations are the worst wide open on point light sources. The most common are astigmatism (winged, seagull stars), coma (comet shaped elgongation of stars) and chromatic aberration (green - purple halos around stars). If we take for example, a 24mm 1.4 lens and stop it down to f/3.5, the results will be vastly superior to using it wide open. It will also vastly reduce any lens vignetting. I recommend therefore:
The lens aperture stopped down 1-2 stops from maximum
The shutter speed set to bring the histogram to the 1/3 point from the left if possible (several minutes)
The ISO set to the gain point of the camera, or just above / or the most efficient ISO
Because we are shooting astro landscape style imagery here, I won’t get into some of the technical issues that can arise with deep sky style astro work. If you want to know more, read my deep sky shooting tutorial. I will say though, that as I normally suggest, it is best to consult photonstophotos.net to discover the most efficient ISO for your particular camera. This means we reach a point of interest I need to mention. Generally we do want to bring the exposure off the left wall of the histogram. In doing so we improve shot noise and read noise. However, placing the ISO up to ridiculous values in order to do so is not the way to do so. Aperture and Exposure time are the only two factors that actually influence our exposure. Think of ISO as a digital amplifaction after the fact. So in order to get the histogram looking nice, we need to expose for longer (or if we really are limited by exposure length, open the aperture up a bit, again - we will have to balance with reappearing lens aberrations).
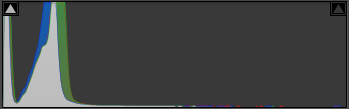
A typical Astro tracked Exposure showing the foreground (left hump) and the sky (right hump)
The above histogram shows two peaks. The first, we aren’t concerned about. That is just the landscape, which could show up quite dark and black in appearance in a tracked sky shot as we are doing here. The second peak is the night sky data - the tracked data which we are interested in. You might say, well: that’s not a third from the left Steve! You would be correct in this assumption, however there are many considerations to balance when tracking the night sky, and many more options. We have to consider that we are balancing background sky noise (the noise in the ‘blackness’ of space between the starlight) and the exposure of the stellar structures of the stars and their cores. If we expose for too long, particularly at a high ISO setting, we will blow out the stars to white - perhaps loose all the detail and colour information here. Decisions therefore have to be made at the time of shooting as to how best balance this. Often, as with daylight photography, it is best to protect as much highlight information as possible, which is what I tend to do.
Foregrounds with the Star Tracker Method
Foregrounds with the star tracker method are admittedly, trickier to manage. The shooting part is simple enough: we just turn off the star tracker motion and capture the foreground in the same way as we do with the stacking method of shooting. However, it is the post processing that becomes more complex in doing so. Essentially what we will be left with after shooting; is a highly detailed (requiring stretching and processing of course) tracked sky image, and another image of the landscape below. Any landscape contained within the tracked sky shot will have blurred due to the motion of the star tracker. This is the reason that the editing becomes more complex. We have to blend these two exposures together to make the final picture, however we have the complexity of making selections and blending with enough precision, that we hide this blurred area from the final result.
Milky Way Core over Glencoe - a 35mm mosaic image with a star tracker. Natural night sky colour.
Making Mosaics
Quality astro panoramas, or a better term - mosaics, are really only accessible through star tracker use. This is because very few lenses are clean from a wide open aperture to be able to stitch well, have too high vignettes and also the longer focal lengths show star trailing much quicker than on wide angle lenses. Making mosaics is essentially the same groundwork that we need to do during daytime panoramic images. During the day, we can do these handheld if needed, due to the vast quantities of light available to us. At night, we of course must use a tripod and ideally a star tracker. Ultra Wide Angle Lenses as you may know, are not the best for making panoramic images during the day. They introduce distortion, both lens and perspective based and can cause issues when trying to stitch starlight. I have made plenty of astro mosaics with a 20mm lens however. These are quite easy to make as the field of view allows us to cover extremely large portions of the night sky with large overlaps to ensure they stitch. Longer focal lengths have a slowly ramping difficulty; however the reward is a more detailed and impressive view after stitching.
To make a mosaic we need to:
Shoot the sky with the star tracker on and make the field of view required for the final shot
Turn the star tracker off and shoot the foreground on it’s own.
Start with a 20-28mm lens and do large overlaps, in the region of 30% to allow software to easily stitch the images
Shoot the sky in a logical way in rows, usually at least 2-3
With the star tracker on, we need to set all the usual parameters and work our way along the sky, ensuring we keep a 30% overlap between each image. To make it even easier for the stitching software, we need to keep the panels level as we move across the sky in a vertical alignment. We are essentially making vertical slices out of the sky, overlapping them and doing a row, then switching down and going along again in a similar fashion until we have covered the sky area we need for the image. It is always best to go outwith the area we think we need. Stitching may loose some of the edges, so make sure you always over shoot the entire frame. The settings should all remain identical; exposure and focus should not be changed to ensure consistency between each and every sky frame taken.
In order to process a mosaic, it can quickly feel overwhelming especially if this is your first time. Essentially we need to stitch the sky frames into a mosaic, then do this once again for all the foreground frames. We then end up with a sky mosaic, and a foreground mosaic. These must be processed, then blended together in an image editor such as Photoshop.
Milky Way Mosaic - with a 24mm 1.4 prime lens on a star tracker.
Milky Way over Dunnottar Castle, a mosaic. The first serious mosaic I ever completed, 2019. Lens used - 14mm 1.8 Sigma Art
This page is being continually developed and expanded. Last updated 3rd Jan 2025.