Shallow Depth of Field in Landscape Photography
Introduction
The established convention when shooting landscape photography has always been to shoot significantly stopped down, that is, using small apertures. The reason for this is to increase depth of field: the amount of area in clear, acceptable focus within the picture itself. Whilst I do use F/8 a great deal, I use and consider other apertures often, for different reasons and have also for some years been going completely against convention and shooting wide open with prime lenses in landscape situations. This is not about just trying to be different or go against convention, and more about using an aperture and design for the shot that creates the strongest overall picture with all things considered. I note that there is a new craze in landscape photography to have complete front to back sharpness in a picture, which to me looks very unnatural and a little plasticy - faked, because it just is not how our eyes work.
What Does Shooting At Small Apertures Do? (F/8 - F-22)
Shooting at small apertures achieves several things:
Increases the depth of field within an image.
Allows longer shutter speeds in lowered light, or in bright light in combination with the use of a Neutral Density filter.
Usually allows the photographer to achieve a good across frame sharpness, as most lenses are extremely good by the time they are stopped down, even ones which are softer wide open.
If stopped down excessively, it can incur diffraction which causes image softness. (I’d still shoot here for the right reasons, just be aware of this). On full frame, diffraction effects come into play more around F/11, for crop cameras, at about F/8.
Normally allows diffraction spikes, or sunstars to appear around points of light with good landscape lenses.
Decreases lens vignetting.
Decreases risk of lens aberrations showing up.
In many lenses, causes increased risk of flaring between lens elements. This can sometimes be used creatively.
What Does Shooting at Large Apertures Do? (F/1 - F/5.6)
Shooting at large apertures achieves several things:
Decreases the depth of field within an image.
In general, allows faster shutter speeds across the board.
Allows a photographer to select an area of greater interest, ie the subject and further direct the eye within the shot.
Prevents diffraction effects within the depth of field / focal plane areas.
Increases lens vignetting
Increases risk of lens aberrations showing up
Reduces the risk of flaring.
As mentioned at the beginning of this article, I have for some time been questioning this standard F/8 approach to landscape photography and if honest, have become a little bored with the same by the numbers shots and apertures. My ethos for the most part (there are exceptions) is that I do not focus stack. Focus stacking often produces really unnatural ‘digital’ looking pictures because everything from the closest corner to the sky miles in the distance is in focus; there is no depth. Even where shots require a smaller aperture, say F/8 with a 24mm lens, this will not give front to back sharpness with an object near to the camera. In these situations, I often let the close corners, and the very close foreground be slightly out. I don’t want people looking right down there, I want the eye to come up to the subject and flow through the image. Sometimes the problem is we include too many subjects in our photographs and make the scene overall too complex when we should be distilling things down for the viewer. In photography, we direct the eye through a shot to our subject in many ways, including; brightness, sharpness, contrast, composition. We can also use that depth of field to be a further visual clue. Most of us have been subjected to the cliché daisy and mountain landscape shots that are paraded over the internet. Just google it and see what I mean. Notice how unusual it feels to have daisies, or wild flowers so close to the camera all perfectly in focus (and unnaturally brightened too), however also have the distant mountain seemingly be in exactly the same plane of focus? It’s just not how our eyes work. We sense this and it feels fake. (Most of the time the processing of these shots doesn’t help either, because the photographer uses very restrictive masking selections and overbrightens scene elements). For more reading on this concept, see the article I wrote on ‘Realism in Landscape Photography’ here.
When Is Focus Stacking A Good Idea?
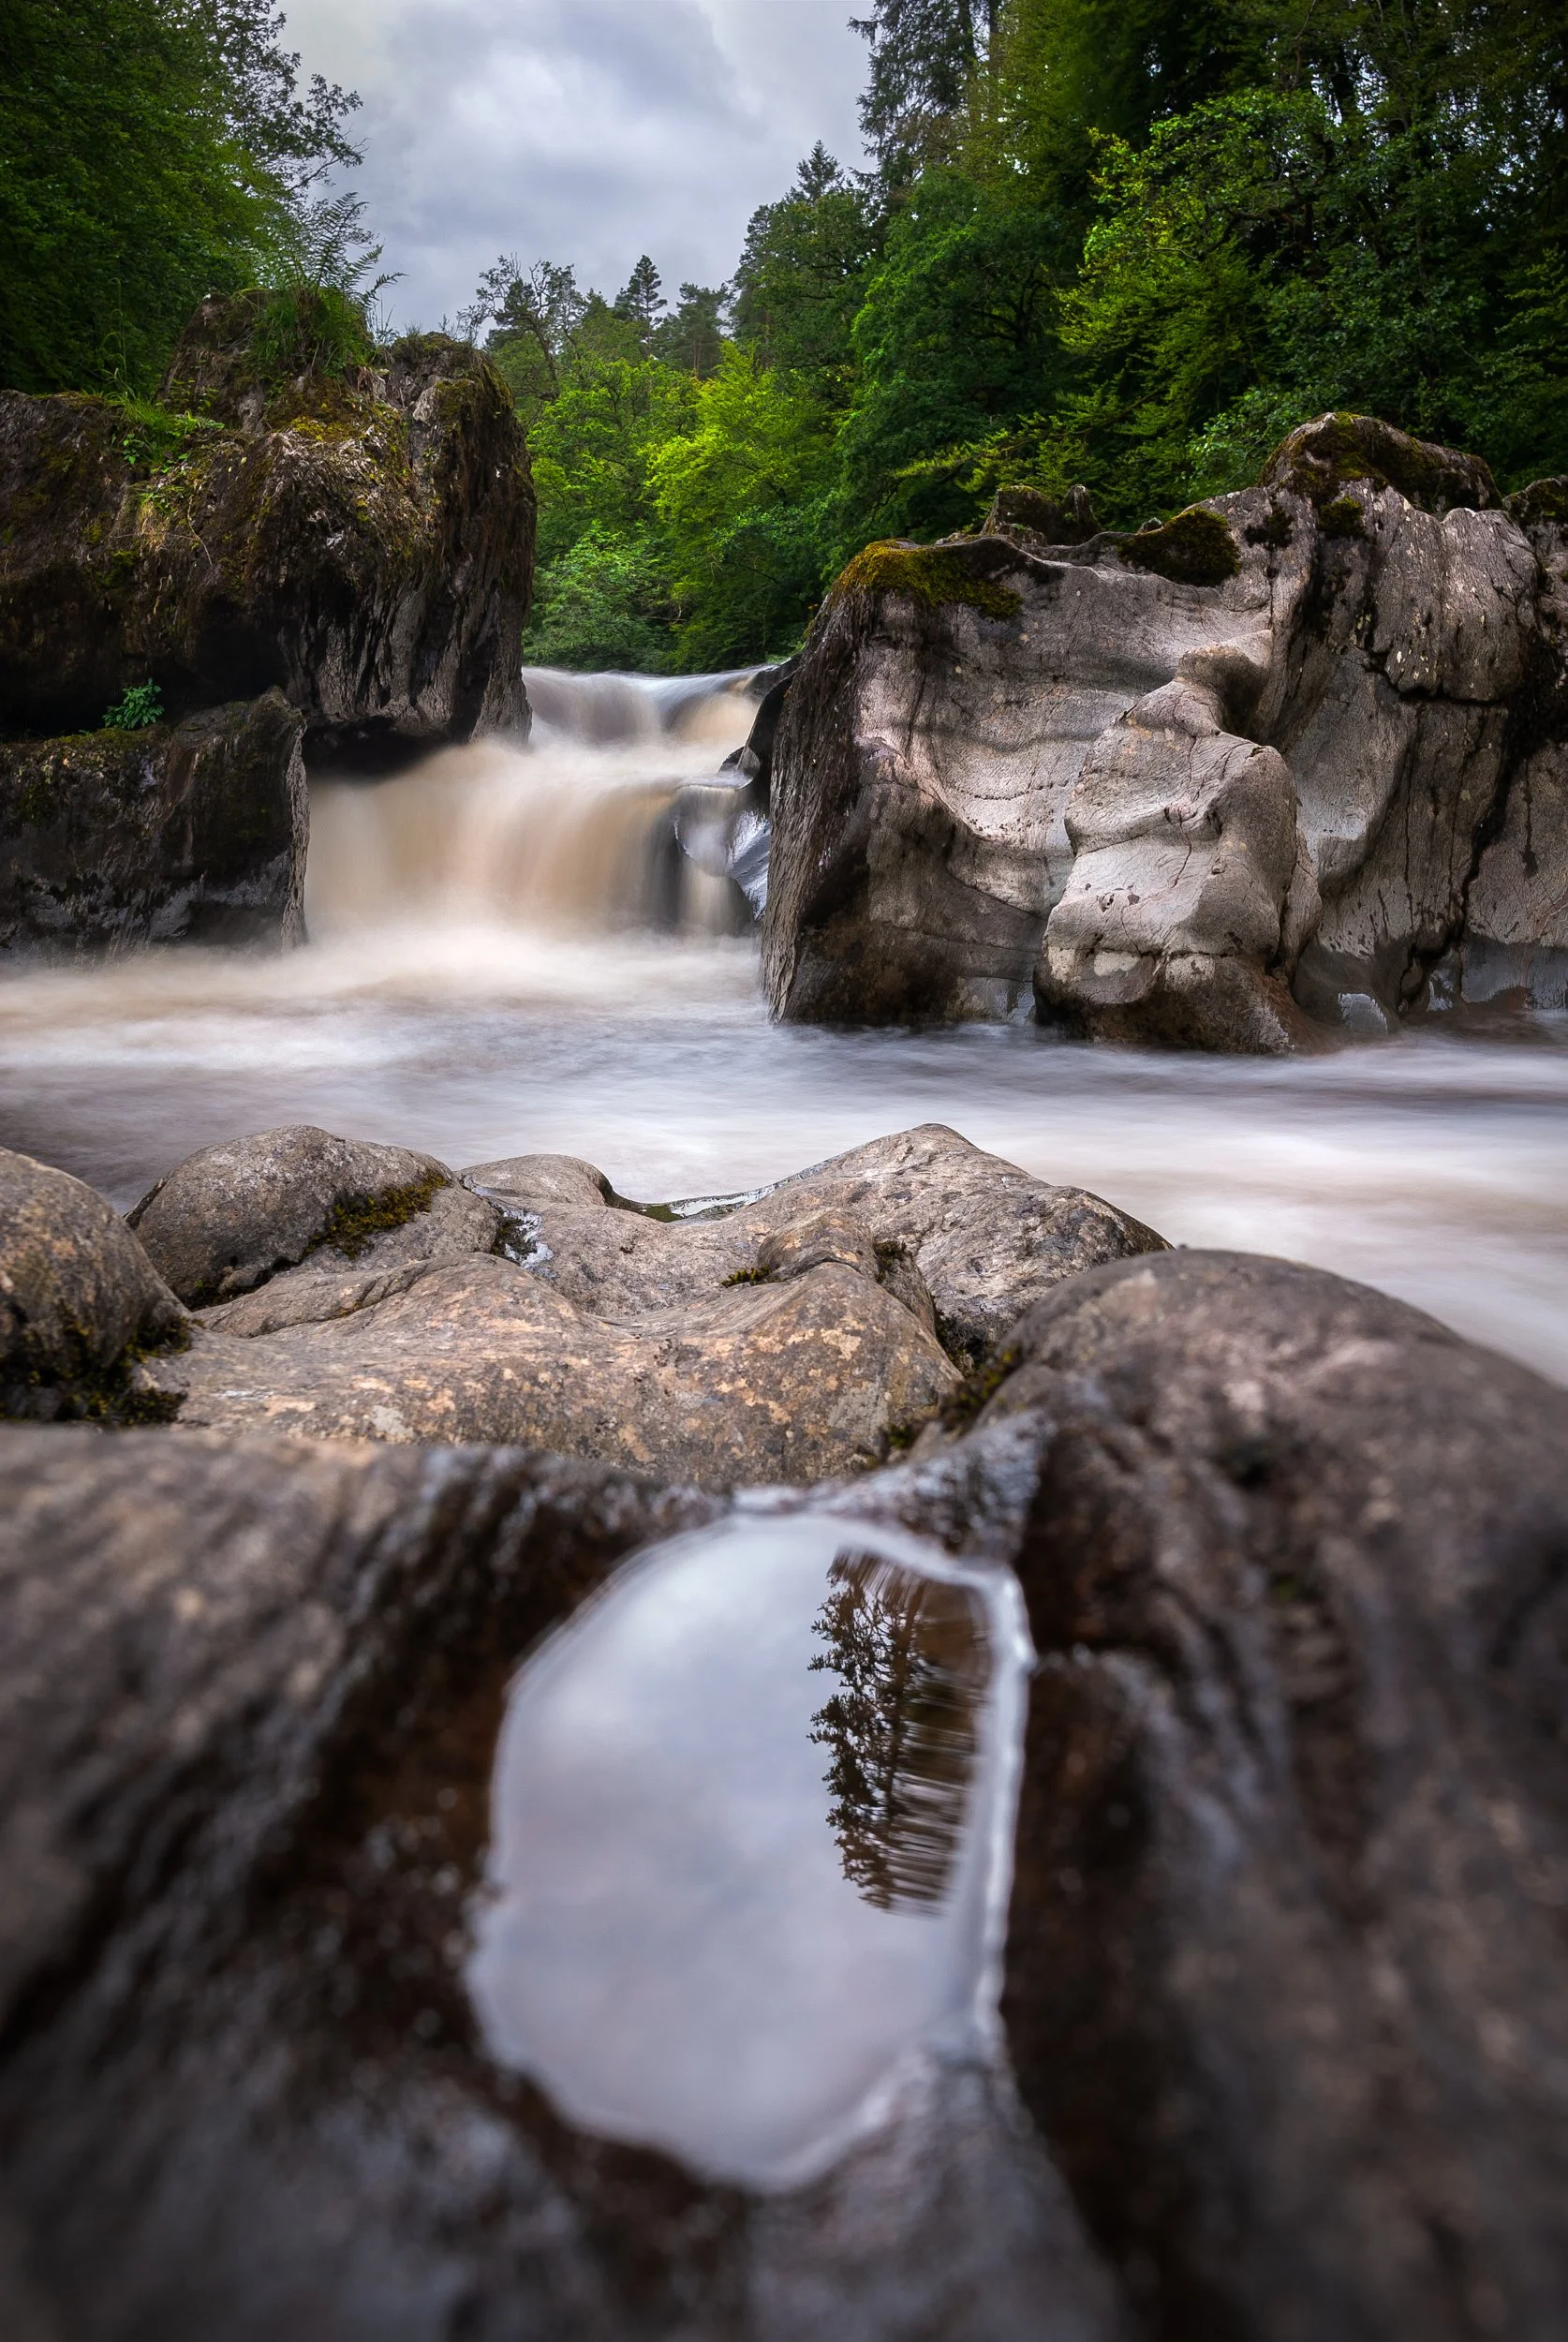
Perthshire, Scotland. Nikon 14-24/2.8S
There are of course times when focus stacking is the way to go. Notice this shot from Perthshire of Black Linn Falls in Autumn. This was shot with a 14-24/2.8S Z mount lens at 14mm. If you believe what is said online, you would think that this scene, shot at this wide of a focal length, could simply be shot at f/8 or f/11 to achieve the result you are seeing, but you would be incorrect. This is a two shot focus stack, one on the very foreground rock at f/11, and one of the distance at f/8. This allows me for this scene, to achieve a good depth of field up at the bottom front rock area which has interest here. Why did I feel this necessary? Well, it’s part of the shot, and thus it tells part of the story, in addition it is also quite bright in the scene itself. Of course I still want the viewer’s eye to flow from the bottom upwards, which I think it does here. Conversely, it doesn’t make a huge amount of sense if we concern ourselves with the near foregrounds in shots like this:
Isle of Skye Scotland, Nikon D850 and 20mm 1.8G at F/8
The very nearest grass roots, and the dark corners are not somewhere that we need the eye moving to. Thus it is realistically counterintuitive to focus stack, especially if you consider wind and moving long grass. It would not have added a single thing to the final picture. Let’s have a look at another shot which shows more exaggerated falloff in the front of the frame with regards to obvious loss of depth of field:
Depth of Field used to Drive the Eye down through the image, with a twist
This was a long exposure shot taken in summer 2020 by my then nine year old son (with a little help composing) on his D200 with a 20mm 1.8G nikkor lens. Like me, he was quickly fascinated by the effect a long exposure could provide in an image and took to it very well. I love the layers in this image, we have the obvious falloff in the corners and around the rock, but because the pool is a reflection and the tree lines at ‘infinity’ it is in sharp focus, with an unsettling hint of blur at it’s edges. We know where we are supposed to look, and the aperture reinforces this. We could have focus stacked. It would have required a good few extra frames in this example, because we where right on the ground here and ultra close to the foreground elements. However, would it really have added anything, or just taken away from the mood here? This is an interesting case. because although this isn’t really shot at a large aperture (he used F/9, and consider the D200 is an APS-C sensor camera), it still creates a very shallow depth of field effect because he was so close to the rocks, and the aperture will not be able to bring this area into sharp focus (consider the minimum focus distance of the lens too). Finally, let’s look at the headline picture in this article:

35mm 1.4 Sigma Art
So, why am I using such a wide aperture here in this picture? Why am I not at f/11 for this scene, considering I am at a 35mm focal length and focus stacking? Well the real question I ask is, what would it have actually added? The foreground is dark, and it is better serving as a context and visual frame. This is a good demonstration of shallow depth of field used effectively within the constraints of the landscape photography genre. This particular shot was made with a 35mm f/1.4 prime lens, which was shot at f/1.8. There are several things to note here. The use of the prime is important, because we are going to be able to control the foreground blur more. In addition to this, because of the larger aperture, it will have more pleasing out of focus elements than it would be on a f/2.8 zoom lens, in terms of quantity and quality of that blur. (Note, I have upgraded to the optically superb Tamron 35mm f/1.4 now).
Further to these two points, the vignette which exists naturally at these wide apertures also further directs the eye, and places the foreground in further shadow. One thing I find landscape photographer’s do not consider much is that large vignette’s can be so effective when shooting landscapes. Using a class leading DSLR or Mirrorless body and a fast prime which vignettes decently at large apertures, allows me to control dynamic range even more effectively; it’s actually a boon, not a curse. This pushes the brightness of bright skies and white clouds down a good bit, further balancing the exposure and allows me to often capture the full range of light in a singular shot without the need for exposure blending, tripods or graduated neutral density filters. This leads me to another advantage. Sometimes I am so tired of tripods, in these conditions I grab one or two primes and head out to craft pictures. Yes, this shot was made completely hand held.
Final Thoughts
The next time you think that F/8 and be there is the only way, which is the accepted phrase for ‘use small apertures, Jim’ consider that their are other, arguably more effective ways to build a picture on a case by case basis. I often bring a 35mm prime with me in addition to a 24-70/2.8S on most trips as it allows best access to this technique. Even despite the fact that I have used a prime lens here, as I have shown in this article, even F/8 apertures will produce out of focus foreground elements when used close to subjects, giving an effective visual clue in an image to direct the eyes. I don’t want to sound like some of these youtubers with their “You Don’t Need A Tripod’ videos, because that is a nonsense also, however it is without a doubt a definite and effective technique to use in the field.
If you enjoyed this article, consider following me on Instagram or Facebook.
Steve